Developer Tutorial: Adding a new ocean/sea ice regionally refined mesh (RRM)
This tutorial presents a step-by-step guide to adding a new mesh to the
global_ocean test group in compass (see the Glossary for
definitions of some relevant terms). In this tutorial, I will add a new
mesh called YAM (“yet another mesh”) that is based on techniques used to build
the existing SO12to30 and SOwISC12to30 as well as
WC14 and WCwISC14 meshes.
Getting started
To begin with, you will need to check out the compass repo and create a new
branch from main for developing the new mesh. For this purpose, we
will stick with the simpler approach in Set up a compass repository: for beginners here, but feel
free to use the worktree approach instead if you are comfortable with it.
git clone git@github.com:MPAS-Dev/compass.git add-yet-another-mesh
cd add-yet-another-mesh
git checkout -b add-yet-another-mesh
Now, you will need to create a conda environment for developing compass, as described in compass conda environment, compilers and system modules. We will assume a simple situation where you are working on a “supported” machine and using the default compilers and MPI libraries, but consult the documentation to make an environment to suit your needs.
# this one will take a while the first time
./conda/configure_compass_env.py --conda $HOME/miniforge --env_name compass_yam
If you don’t already have Miniforge3 installed in the directory pointed to by
--conda, it will be installed automatically for you. If all goes well, you
will have a file named load_compass_yam*.sh, where the details of the
* depend on your specific machine and compilers. For example, on
Chrysalis, you will have load_compass_yam_chrysalis_intel_openmpi.sh,
which will be the example used here:
source load_compass_yam_chrysalis_intel_openmpi.sh
Now, we’re ready to get the MPAS-Ocean source code from the E3SM repository:
# Get the E3SM code -- this one takes a while every time
git submodule update --init --recursive
Next, we’re ready to build the MPAS-Ocean executable:
cd E3SM-Project/components/mpas-ocean/
make ifort
cd ../../..
The make target will be different depending on the machine and compilers, see Supported Machines or Other Machines for the right one for your machine.
Now, we’re ready to start developing!
Adding a new mesh
Use any method you like for editing code. If you haven’t settled on a method
and are working on your own laptop or desktop, you may want to try an
integrated development environment (PyCharm
is a really nice one). They have features to make sure your code adheres to
the style required for compass (see Code Style). vim, emacs or
a similar tool will work fine on supercomputers. Keep in mind that you can
edit code on your laptop or desktop but you will need to use a high-performance
computing (HPC) machine to generate a mesh. One step requires >=360 cores to
remap a high resolution topography dataset to the MPAS mesh.
Your new mesh will be defined in a directory within the global_ocean test
group’s mesh package. For this example, we create a new yam10to60
directory in compass/ocean/tests/global_ocean/mesh. The directory name
should be all lowercase with no underscores. The convention is to give your
mesh a short prefix (yam for “yet another mesh” in our case) and then
the finest and coarsest resolutions in km. In that directory, we
will make a new file called __init__.py. In that file, we will start to
define a YAM10to60BaseMesh class.
cd compass/ocean/tests/global_ocean/mesh
mkdir yam10to60
cd yam10to60
vim __init__.py
We define the resolution as a function of space using a regular
latitude-longitude map of the distance between cell centers in km. To begin
with , we will start out with something really simple: a quasi-uniform 60 km
mesh. We will make a 2D field called cellWidth on a 0.1 degree, regular
latitude-longitude grid.
import numpy as np

from compass.mesh import QuasiUniformSphericalMeshStep


class YAM10to60BaseMesh(QuasiUniformSphericalMeshStep):
    """
    A step for creating YAM10to60 meshes
    """

    def build_cell_width_lat_lon(self):
        """
        Create cell width array for this mesh on a regular latitude-longitude
        grid

        Returns
        -------
        cellWidth : numpy.array
            m x n array of cell width in km

        lon : numpy.array
            longitude in degrees (length n and between -180 and 180)

        lat : numpy.array
            longitude in degrees (length m and between -90 and 90)
        """

        dlon = 0.1
        dlat = dlon
        nlon = int(360. / dlon) + 1
        nlat = int(180. / dlat) + 1
        lon = np.linspace(-180., 180., nlon)
        lat = np.linspace(-90., 90., nlat)

        cell_width = 60.0 * np.ones((nlat, nlon))

        return cell_width, lon, lat
We also need a config file for the mesh. For now, it can just be empty:
touch yam10to60.cfg
Next, we need to add this mesh to the list of known meshes:
cd ..
vim __init__.py
...

from compass.ocean.tests.global_ocean.mesh.so12to30 import SO12to30BaseMesh
from compass.ocean.tests.global_ocean.mesh.wc14 import WC14BaseMesh
from compass.ocean.tests.global_ocean.mesh.yam10to60 import YAM10to60BaseMesh
from compass.ocean.tests.global_ocean.metadata import (
    get_author_and_email_from_git,
)

...

class Mesh(TestCase):

...

    def __init__(self, test_group, mesh_name, remap_topography):

    ...

        elif mesh_name.startswith('Kuroshio'):
            base_mesh_step = KuroshioBaseMesh(self, name=name, subdir=subdir)
        elif mesh_name in ['WC14', 'WCwISC14']:
            base_mesh_step = WC14BaseMesh(self, name=name, subdir=subdir)
        elif mesh_name in ['YAM10to60', 'YAMwISC10to60']:
            base_mesh_step = YAM10to60BaseMesh(self, name=name, subdir=subdir)
        else:
            raise ValueError(f'Unknown mesh name {mesh_name}')
In compass, we support 2 versions of nearly every mesh, 1 where everything
south of the Antarctic coast is treated as land and 1 where we include the
ocean cavities below Antarctic ice shelves (wISC, meaning “with ice-shelf
cavities”)
Next, we add a test case for making this mesh to the global_ocean test
group:
cd ..
vim __init__.py
...

class GlobalOcean(TestGroup):

    ...

    def __init__(self, mpas_core):

        ...

        self._add_tests(mesh_names=['WC14', 'WCwISC14'],
                        DynamicAdjustment=WC14DynamicAdjustment)

        # Kuroshio meshes without ice-shelf cavities
        self._add_tests(mesh_names=['Kuroshio12to60', 'Kuroshio8to60'],
                        DynamicAdjustment=KuroshioDynamicAdjustment)

        for mesh_name in ['YAM10to60', 'YAMwISC10to60']:
            mesh_test = Mesh(test_group=self, mesh_name=mesh_name,
                             remap_topography=True)
            self.add_test_case(mesh_test)

        # A test case for making E3SM support files from an existing mesh
        self.add_test_case(FilesForE3SM(test_group=self))
Okay, great! We’re ready to test this out!
Running the mesh test case
First, let’s make sure the mesh exists when we list the available test cases in compass:
compass list
You should see something like:
 ...

 250: ocean/global_ocean/Kuroshio8to60/WOA23/init
 251: ocean/global_ocean/Kuroshio8to60/WOA23/performance_test
 252: ocean/global_ocean/Kuroshio8to60/WOA23/dynamic_adjustment
 253: ocean/global_ocean/Kuroshio8to60/WOA23/files_for_e3sm
 254: ocean/global_ocean/YAM10to60/mesh
 255: ocean/global_ocean/YAMwISC10to60/mesh
 256: ocean/global_ocean/files_for_e3sm
 257: ocean/gotm/default

 ...
On one of the supported HPC machines, let’s try setting up and running the mesh
step. We will concentrate on the mesh without ice-shelf cavities YAM10to60
for now because it is a little simpler. Here’s an example that should work on
Chrysalis or Anvil:
compass setup -n 254 \
    -p E3SM-Project/components/mpas-ocean/ \
    -w /lcrc/group/e3sm/${USER}/compass_tests/tests_20230527/yam10to60_uniform60km
The number provided (e.g. 254) is the number of the test case in
compass list above. Since these numbers change frequently, you should
check each time you check out or rebase the code with something like
compass list | grep YAM
The directory you point to with -p is where you build MPAS-Ocean. We don’t
actually need that quite yet but we will soon when we add an initial condition
on the mesh. The base work directory you point to with -w should be a
location in a scratch space where you can set up temporary tests. We recommend
including a date somewhere in the path just to keep things organized but that
is up to you.
For simplicity, it is a good idea to open a new terminal for running the test. In the new terminal window:
cd /lcrc/group/e3sm/${USER}/compass_tests/tests_20230527/yam10to60_uniform60km
vim job_script.custom.sh
sbatch job_script.custom.sh
If you prefer, you can get an interactive node and run the same commands as in the job script:
source load_compass_env.sh
compass run custom
Assuming you submitted the job script as above, you can monitor the output file:
$ tail -f compass.o*

Loading conda environment
Done.

Loading Spack environment...
Done.

ocean/global_ocean/YAM10to60/mesh
  * step: base_mesh
  * step: remap_topography
  * step: cull_mesh
  test execution:      SUCCESS
  test runtime:        11:31
Test Runtimes:
11:31 PASS ocean_global_ocean_YAM10to60_mesh
Total runtime 11:32
PASS: All passed successfully!
If things don’t go well, you might see something like:
Loading conda environment
Done.

Loading Spack environment...
Done.

ocean/global_ocean/YAM10to60/mesh
  * step: base_mesh
      Failed
  test execution:      ERROR
  see: case_outputs/ocean_global_ocean_YAM10to60_mesh.log
  test runtime:        00:00
Test Runtimes:
00:00 FAIL ocean_global_ocean_YAM10to60_mesh
Total runtime 00:01
FAIL: 1 test failed, see above.
Hopefully, the contents of the log file, in this case
case_outputs/ocean_global_ocean_YAM10to60_mesh.log, can help you debug
what went wrong.
Once the base_mesh step has completed, you should see:
$ ls ocean/global_ocean/YAM10to60/mesh/base_mesh/
base_mesh.nc          geom.msh             mesh.cfg           opts.log
base_mesh_vtk         graph.info           mesh.msh           spac.msh
cellWidthGlobal.png   job_script.sh        mesh_triangles.nc  step.pickle
cellWidthVsLatLon.nc  load_compass_env.sh  opts.jig
The main result is the file base_mesh.nc
$ cd ocean/global_ocean/YAM10to60/mesh/base_mesh/
$ source load_compass_env.sh
$ ncdump -h base_mesh.nc

netcdf base_mesh {
dimensions:
    Time = UNLIMITED ; // (0 currently)
    nCells = 165049 ;
    nEdges = 495141 ;
    nVertices = 330094 ;
    maxEdges = 8 ;
    maxEdges2 = 16 ;
    TWO = 2 ;
    vertexDegree = 3 ;
variables:
    int edgesOnEdge(nEdges, maxEdges2) ;

...
You can get take a look at the map of resolution in cellWidthGlobal.png:
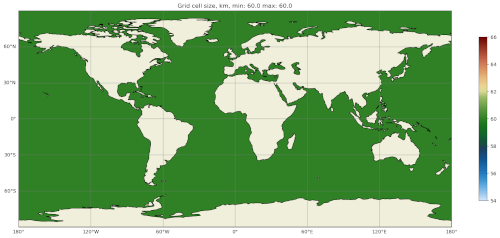
Not very interesting so far but it will be informative once we start to vary the resolution later.
If you want to view the mesh, you can copy the file
base_mesh_vtk/staticFieldsOnCells.vtp over to your laptop or desktop and
open it in ParaView. See
ParaView VTK Extractor
for more details on the tool used to extract the mesh VTK file.
The remap_topography step will produce:
$ cd ../remap_topography/
$ ls
base_mesh.nc                                    src_mesh.nc
dst_mesh.nc                                     step.pickle
job_script.sh                                   topography.nc
load_compass_env.sh                             topography_ncremap.nc
map_0.013x0.013degree_to_YAM10to60_conserve.nc  topography_remapped.nc
mesh.cfg
Here, the main result is topography_remapped.nc, the ocean bathymetry and
Antarctic ice topography remapped to the mesh defined in base_mesh.nc.
Finally, the cull_mesh step will remove land cells from the mesh:
The remap_topography step will produce:
$ cd ../cull_mesh/
$ ls
base_mesh.nc                     job_script.sh
critical_blockages.geojson       land_mask.nc
critical_blockages.nc            land_mask_with_land_locked_cells.nc
critical_passages.geojson        load_compass_env.sh
critical_passages_mask_final.nc  mesh.cfg
critical_passages.nc             step.pickle
culled_graph.info                topography_culled.nc
culled_mesh.nc                   topography.nc
culled_mesh_vtk
Here, the main output is culled_mesh.nc. Similarly to the base mesh, you
can look at the the culled mesh in ParaVeiw by copying
culled_mesh_vtk/staticFieldsOnCells.vtp to your laptop or desktop.
Here, we have placed a white sphere inside the mesh so the land regions are easier to see. After culling, the land just appears as holes in the mesh.
Switching to an EC30to60 base resolution
Returning to the terminal where we are developing the code, let’s make the mesh more interesting.
So far, all E3SM ocean and sea-ice RRMs start with the EC30to60 (eddy-closure 30 to 60 km) mesh as their base resolution. Let’s do the same here. Starting from the base of your development branch:
cd compass/ocean/tests/global_ocean/mesh/yam10to60
vim __init__.py
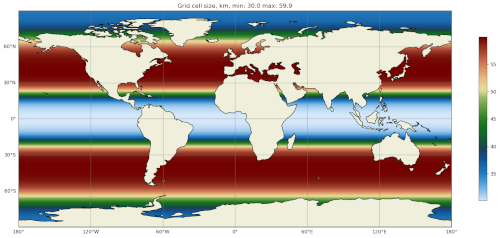
We will replace the constant 60-km mesh resolution with a latitude-dependent function from the mesh_definition_tools module from MPAS-Tools. The default EC mesh has resolutions of 35 km at the poles, 60 km at mid-latitudes and 30 km at the equator.
import mpas_tools.mesh.creation.mesh_definition_tools as mdt
import numpy as np

from compass.mesh import QuasiUniformSphericalMeshStep


class YAM10to60BaseMesh(QuasiUniformSphericalMeshStep):

    ...

    def build_cell_width_lat_lon(self):

        ...

        lat = np.linspace(-90., 90., nlat)

        cell_width_vs_lat = mdt.EC_CellWidthVsLat(lat)
        cell_width = np.outer(cell_width_vs_lat, np.ones([1, lon.size]))

        return cell_width, lon, lat
At this point, you can set up and test again like you did in Running the mesh test case, but this time you will want to use a different work directory name, e.g.:
compass setup -n 254 \
    -p E3SM-Project/components/mpas-ocean/ \
    -w /lcrc/group/e3sm/${USER}/compass_tests/tests_20230527/yam10to60_ec
Switch back to your other terminal to submit the job and look at the results.
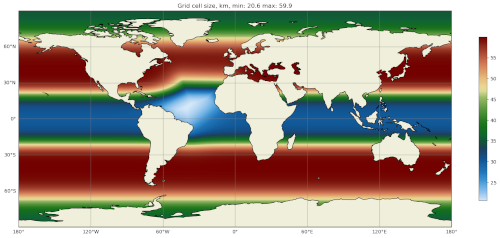
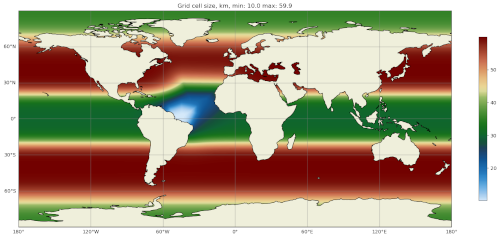
The map of resolution in base_mesh/cellWidthGlobal.png should look like:
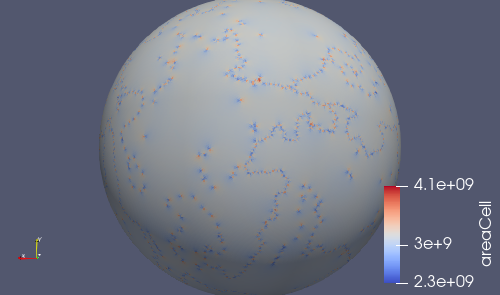
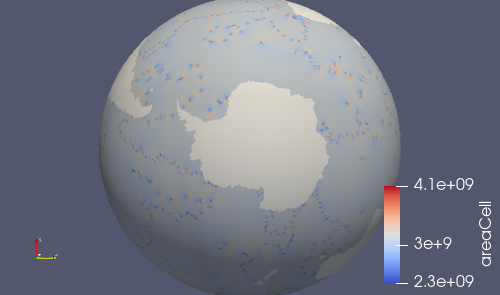
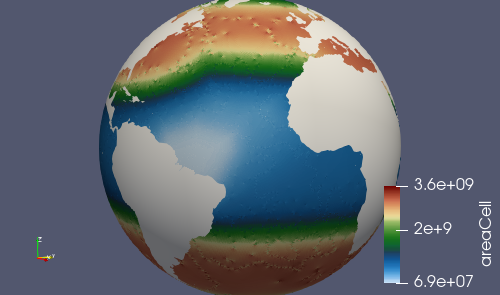
After culling, the mesh in culled_mesh/culled_mesh_vtk/staticFieldsOnCells.vtp
should look like:
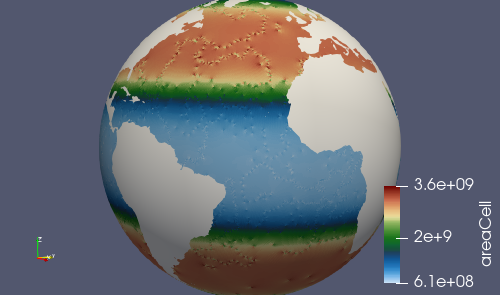
Adding regions of higher resolution
Now, let’s add some regions of higher resolution to the mesh.
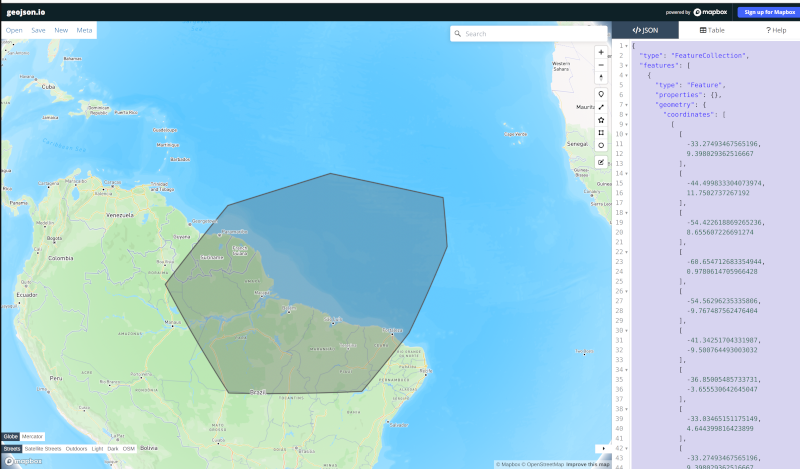
We typically define these regions using geojson files. The easiest way to create them is to go to geojson.io. There, you can find your way to the part of the globe you want to refine and use the polygon tool to make a shape that will act as the boundary for your high resolution region.
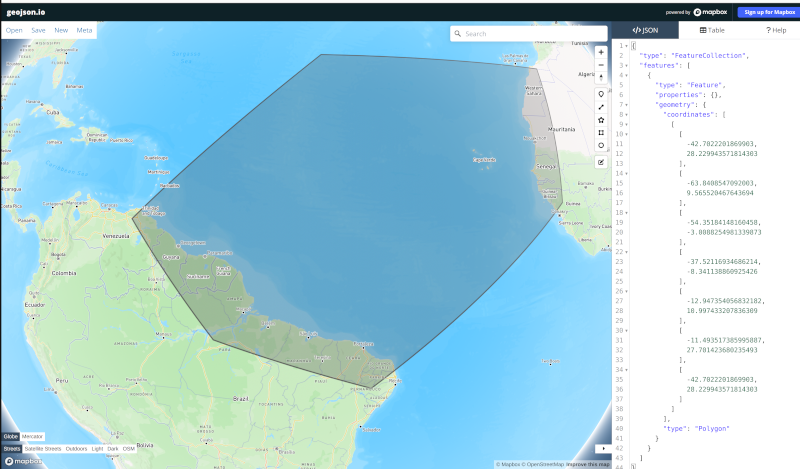
In my case, I have defined a region across the south Atlantic ocean with its western side centered around the outlet of the Amazon river. My plan is to define a region of moderately higher resolution across a fairly broad region first, then define a region of higher resolution close to the Amazon delta in a subsequent step.
Let’s make an actual geojson file with this contents. In your terminal for
editing code, from the root of the branch where we’re developing:
cd compass/ocean/tests/global_ocean/mesh/yam10to60
vim northern_south_atlantic.geojson
Copy the contents of the json code on the right-hand side of the geojson.io window and paste it into the file:
{
  "type": "FeatureCollection",
  "features": [
    {
      "type": "Feature",
      "properties": {},
      "geometry": {
        "coordinates": [
          [
            [
              -42.7022201869903,
              28.229943571814303
            ],
            [
              -63.8408547092003,
              9.565520467643694
            ],
            [
              -54.35184148160458,
              -3.0088254981339873
            ],
            [
              -37.52116934686214,
              -8.341138860925426
            ],
            [
              -12.947354056832182,
              10.997433207836309
            ],
            [
              -11.493517385995887,
              27.701423680235493
            ],
            [
              -42.7022201869903,
              28.229943571814303
            ]
          ]
        ],
        "type": "Polygon"
      }
    }
  ]
}
Then, modify the properties dictionary similarly to this example:
{
  "type": "FeatureCollection",
  "features": [
    {
      "type": "Feature",
      "properties": {
        "name": "Northern South Atlantic",
        "component": "ocean",
        "object": "region",
        "author": "Xylar Asay-Davis"
      },

      ...
These 4 fields are required for compass to be able to use the file. The
name and author are entirely up to you and are intended to help
document the file in some useful way. The component must be "ocean"
and the object must be "region".
Next, let’s make the shape available in the code so we can use it later to make a higher resolution region:
vim __init__.py
import mpas_tools.mesh.creation.mesh_definition_tools as mdt
import numpy as np
from geometric_features import read_feature_collection

from compass.mesh import QuasiUniformSphericalMeshStep


class YAM10to60BaseMesh(QuasiUniformSphericalMeshStep):
    """
    A step for creating YAM10to60 meshes
    """
    def setup(self):
        """
        Add some input files
        """
        package = 'compass.ocean.tests.global_ocean.mesh.yam10to60'
        self.add_input_file(filename='northern_south_atlantic.geojson',
                            package=package)
        super().setup()

    def build_cell_width_lat_lon(self):

        ...

        cell_width_vs_lat = mdt.EC_CellWidthVsLat(lat)
        cell_width = np.outer(cell_width_vs_lat, np.ones([1, lon.size]))

        # read the shape
        fc = read_feature_collection('northern_south_atlantic.geojson')

        return cell_width, lon, lat
In the setup() method above, we add the geojson file as an input to the
step that creates the base mesh. This is how compass finds the geojson file
when it’s setting up the work directory where we will build the base mesh.
In the build_cell_width_lat_lon() method, we read in a the geojson file
into a “feature collection” (fc) object that we will use below to define
the higher resolution region.
Now, let’s make further changes to the same file to use the shape to add a higher resolution region:
vim __init__.py
import mpas_tools.mesh.creation.mesh_definition_tools as mdt
import numpy as np
from geometric_features import read_feature_collection
from mpas_tools.cime.constants import constants
from mpas_tools.mesh.creation.signed_distance import (
    signed_distance_from_geojson,
)

from compass.mesh import QuasiUniformSphericalMeshStep


class YAM10to60BaseMesh(QuasiUniformSphericalMeshStep):

    def build_cell_width_lat_lon(self):

        ...

        cell_width_vs_lat = mdt.EC_CellWidthVsLat(lat)
        cell_width = np.outer(cell_width_vs_lat, np.ones([1, lon.size]))

        # read the shape
        fc = read_feature_collection('northern_south_atlantic.geojson')

        # How wide in meters the smooth transition between the background
        #   resolution and the finer resolution regions should be.
        # 1200 km is equivalent to about 10 degrees latitude
        trans_width = 1200e3

        # The resolution in km of the finer resolution region
        fine_cell_width = 20.

        # the radius of the earth defined in E3SM's shared constants
        earth_radius = constants['SHR_CONST_REARTH']

        # A field defined on the lat-long grid with the signed distance away
        # from the boundary of the shape (positive outside and negative inside)
        atlantic_signed_distance = signed_distance_from_geojson(
            fc, lon, lat, earth_radius, max_length=0.25)

        # A field that goes smoothly from zero inside the shape to one outside
        # the shape over the given transition width.
        weights = 0.5 * (1 + np.tanh(atlantic_signed_distance / trans_width))

        # The cell width in km becomes a blend of the background cell width
        # and the finer cell width using the weights
        cell_width = fine_cell_width * (1 - weights) + cell_width * weights

        return cell_width, lon, lat
The function signed_distance_from_geojson() creates a functon on the
lat-lon grid that is the distance from any given point on the globe to the
boundary of the shape defined by the geojson file. The distance is positive
outside the shape and negative inside it. For better accuracy in computing the
distance, we subdivide the shape into segments of max_length=0.25 degrees
latitude or longitude. We use the earth_radius defined in E3SM’s shared
constants.
Using the signed distance, we create a blending function weights that goes
from zero inside the shape smoothly to one outside the shape over a distance of
trans_width meters. Then, we use the weights to blend from the fine
resolution inside the shape to the EC30to60 background resolution outside the
shape.
There are also fancier ways to define gradients in resolution, for example using the relative distance between the boundaries of 2 shapes. These are not covered in the tutorial but you can get in touch with the E3SM Ocean Team to discuss ways to define more complex maps of mesh resolution.
Once, again, let’s set up and run the mesh test case like we did in Running the mesh test case:
compass setup -n 254 \
    -p E3SM-Project/components/mpas-ocean/ \
    -w /lcrc/group/e3sm/${USER}/compass_tests/tests_20230527/yam10to60_alt20km
As before, switch back to your other terminal to submit the job and look at the results.
cd /lcrc/group/e3sm/${USER}/compass_tests/tests_20230527/yam10to60_alt20km
sbatch job_script.custom.sh
tail -f compass.o*
The map of resolution in base_mesh/cellWidthGlobal.png should look
like:
After culling, the mesh in culled_mesh/culled_mesh_vtk/staticFieldsOnCells.vtp
should look like:
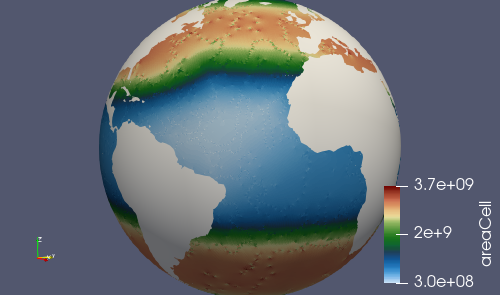
Adding a very high resolution region
Using the same approach as in the previous section, we can define another region where we will increase the resolution to 10 km.
I used geojson.io to create a region around the Amazon River delta:
Then, I copied the code and pasted it into a file:
cd compass/ocean/tests/global_ocean/mesh/yam10to60
vim amazon_delta.geojson
I added the properties dictionary like in the previous example.
{
  "type": "FeatureCollection",
  "features": [
    {
      "type": "Feature",
      "properties": {
        "name": "Amazon Delta",
        "component": "ocean",
        "object": "region",
        "author": "Xylar Asay-Davis"
      },
      "geometry": {
        "coordinates": [
          [
            [
              -33.27493467565196,
              9.398029362516667
            ],
            [
              -44.499833304073974,
              11.7502737267192
            ],
            [
              -54.422618869265236,
              8.655607226691274
            ],
            [
              -60.654712683354944,
              0.9780614705966428
            ],
            [
              -54.56296235335806,
              -9.767487562476404
            ],
            [
              -41.34251704331987,
              -9.500764493003032
            ],
            [
              -36.85005485733731,
              -3.655530642645047
            ],
            [
              -33.03465151175149,
              4.644399816423899
            ],
            [
              -33.27493467565196,
              9.398029362516667
            ]
          ]
        ],
        "type": "Polygon"
      }
    }
  ]
}
Using this feature, I added a 10-km region:
vim __init__.py
...

class YAM10to60BaseMesh(QuasiUniformSphericalMeshStep):
    def setup(self):
        """
        Add some input files
        """
        package = 'compass.ocean.tests.global_ocean.mesh.yam10to60'
        self.add_input_file(filename='northern_south_atlantic.geojson',
                            package=package)
        self.add_input_file(filename='amazon_delta.geojson',
                            package=package)
        super().setup()

    def build_cell_width_lat_lon(self):

        ...

        # A field that goes smoothly from zero inside the shape to one outside
        # the shape over the given transition width.
        weights = 0.5 * (1 + np.tanh(atlantic_signed_distance / trans_width))

        # The cell width in km becomes a blend of the background cell width
        # and the finer cell width using the weights
        cell_width = fine_cell_width * (1 - weights) + cell_width * weights

        # read the shape
        fc = read_feature_collection('amazon_delta.geojson')

        # 400 km is equivalent to about 3 degrees latitude
        trans_width = 400e3

        # The resolution in km of the finer resolution region
        fine_cell_width = 10.

        # A field defined on the lat-long grid with the signed distance away
        # from the boundary of the shape (positive outside and negative inside)
        amazon_delta_signed_distance = signed_distance_from_geojson(
            fc, lon, lat, earth_radius, max_length=0.25)

        # A field that goes smoothly from zero inside the shape to one outside
        # the shape over the given transition width.
        weights = 0.5 * (1 + np.tanh(
            amazon_delta_signed_distance / trans_width))

        # The cell width in km becomes a blend of the background cell width
        # and the finer cell width using the weights
        cell_width = fine_cell_width * (1 - weights) + cell_width * weights

        return cell_width, lon, lat
Same procedure as before, set up the test case:
compass setup -n 254 \
    -p E3SM-Project/components/mpas-ocean/ \
    -w /lcrc/group/e3sm/${USER}/compass_tests/tests_20230527/yam10to60_final
Switch back to your other terminal to submit the job and look at the results.
cd /lcrc/group/e3sm/${USER}/compass_tests/tests_20230527/yam10to60_final
sbatch job_script.custom.sh
tail -f compass.o*
The map of resolution in base_mesh/cellWidthGlobal.png should look
like:
After culling, the mesh in culled_mesh/culled_mesh_vtk/staticFieldsOnCells.vtp
should look like:
Adding an initial condition and performance test
We now have a horizontal ocean mesh, but there are several more steps in compass before we can start to integrate the new mesh into E3SM.
First, we need to add an init test case that will create the vertical
coordinate and the initial condition. Most of what we need to define for the
initial condition is set with config options:
cd compass/ocean/tests/global_ocean/mesh/yam10to60
vim yam10to60.cfg
# Options related to the vertical grid
[vertical_grid]

# the type of vertical grid
grid_type = index_tanh_dz

# Number of vertical levels
vert_levels = 64

# Depth of the bottom of the ocean
bottom_depth = 5500.0

# The minimum layer thickness
min_layer_thickness = 10.0

# The maximum layer thickness
max_layer_thickness = 250.0

# The characteristic number of levels over which the transition between
# the min and max occurs
transition_levels = 28
The standard E3SM v3 vertical grid is defined with these parameters. It transitions from 10 m resolution at the surface to 250 m resolution at a depth of 5500 m over 64 vertical levels. The transition is centered around the 28th vertical level. You can modify these parameters or use a different vertical coordinate (at your own risk).
Next, we add a section with some required config options including some metadata:
vim yam10to60.cfg
...

# The characteristic number of levels over which the transition between
# the min and max occurs
transition_levels = 28


# options for global ocean testcases
[global_ocean]

# the approximate number of cells in the mesh
approx_cell_count = 270000

## metadata related to the mesh
# the prefix (e.g. QU, EC, WC, SO)
prefix = YAM
# a description of the mesh and initial condition
mesh_description = Yet Another Mesh (YAM) is regionally refined around the Amazon
                   River delta.  It is used in E3SM version ${e3sm_version} for
                   studies of blah, blah.  It has Enhanced resolution (${min_res} km)
                   around the Amazon delta, 20-km resolution in the northern South
                   Atlantic, 35-km resolution at the poles, 60-km at mid
                   latitudes, and 30-km at the equator.  This mesh has <<<levels>>>
                   vertical levels.
# E3SM version that the mesh is intended for
e3sm_version = 3
# The revision number of the mesh, which should be incremented each time the
# mesh is revised
mesh_revision = 1
# the minimum (finest) resolution in the mesh
min_res = 10
# the maximum (coarsest) resolution in the mesh, can be the same as min_res
max_res = 60
# The URL of the pull request documenting the creation of the mesh
pull_request = https://github.com/MPAS-Dev/compass/pull/XXX


# config options related to initial condition and diagnostics support files
# for E3SM
[files_for_e3sm]

# CMIP6 grid resolution
cmip6_grid_res = 180x360
The approx_cell_count is something you can only determine after you’ve
made the mesh. In your terminal where you’ve been running tests:
cd /lcrc/group/e3sm/${USER}/compass_tests/tests_20230527/yam10to60_final
cd ocean/global_ocean/YAM10to60/mesh/cull_mesh
source load_compass_env.sh
ncdump -h culled_mesh.nc | more
This will tell you the numer of cells (nCells). Round this to 2
significant digits and put this in approx_cell_count. This will be used
to determine an appropriate number of MPI tasks and nodes needed to perform
forward runs with this mesh.
The prefix should match the beginning fo the mesh name we have been using
all along, YAM in this case.
The description is used in the metadata of files produced by compass for
this mesh. It should be a fairly detailed description of how resolution is
distributed and what the intended purpose of the mesh is.
The e3sm_version is what E3SM version the mesh is intended to be used in.
Presumably, this is 3 for the time being, since no new meshes will be added
to v2 and we don’t know much about v4 yet.
The mesh_revision should be 1 to begin with but should be incremented to
give each version of the mesh a unique number. Typically, it is time to
increase the revision number if you are altering the mesh and the current
revision number has already been used in a simulation that might be published
or put to some other broader scientific or technical use. If you are still at
the stage of tinkering with the mesh, it may be preferable not to increment the
revision number with each modification.
min_res must be the minimum resolution of the mesh in km, and max_res
should be the maximum. (min_res is used to determine the time step for
forward runs, so that is why it is required to be correct; max_res is only
used for metadata and in the mesh name.)
pull_request points to a pull request (if there is one) where the mesh
was added to compass. This is a useful piece of metadata so folks know where
to look for a discussion of the mesh.
cmip6_grid_res is the CMIP6 (and presumably 7) resolution to which data
will be remapped for publication. Typically, this is 180x360 (i.e. a
1 degree grid) for RRMs because a lot of space is otherwise wasted on
coarse-resolution regions.
We also need to override some default namelist options with values appropriate for the mesh. Many of these choices will depend on the details of the mesh you are making. However, here are some common ones:
vim namelist.split_explicit
config_time_integrator = 'split_explicit'
config_run_duration = '0000_01:00:00'
config_use_mom_del2 = .true.
config_mom_del2 = 10.0
config_use_mom_del4 = .true.
config_mom_del4 = 1.5e10
config_hmix_scaleWithMesh = .true.
config_use_GM = .true.
config_GM_closure = 'constant'
config_GM_constant_kappa = 600.0
The config_run_duration is the length of a performance test run, and should
only be a few time steps.
The config_mom_del2 and config_mom_del4 are the eddy viscosity and
eddy hyperviscosity, and typically scale in proportion to the cell size and
the cell size cubed, respectively. These are appropriate values for a minimum
resolution of 10 km as in this example. We scale these coefficients with the
cell resolution when config_hmix_scaleWithMesh = .true..
The GM coefficients can probably be left as they are here for a typical RRM.
Next, we will add the init and performance_tests test cases for the
new mesh:
cd ../..
vim __init__.py
...

class GlobalOcean(TestGroup):

    ...

    def __init__(self, mpas_core):

        ...

        for mesh_name in ['YAM10to60', 'YAMwISC10to60']:
            mesh_test = Mesh(test_group=self, mesh_name=mesh_name,
                             remap_topography=True)
            self.add_test_case(mesh_test)

            init_test = Init(test_group=self, mesh=mesh_test,
                             initial_condition='WOA23')
            self.add_test_case(init_test)

            self.add_test_case(
                PerformanceTest(
                    test_group=self, mesh=mesh_test, init=init_test,
                    time_integrator='split_explicit'))

        # A test case for making E3SM support files from an existing mesh
        self.add_test_case(FilesForE3SM(test_group=self))
We have indicated that we want an initial condition interpolated from the World Ocean Atlas 2023 (WOA23) data set and that we want to use the split-explicit time integrator (the E3SM default) in our performance test.
Let’s see if the test cases show up:
compass list | grep YAM
You should see something like:
254: ocean/global_ocean/YAM10to60/mesh
255: ocean/global_ocean/YAM10to60/WOA23/init
256: ocean/global_ocean/YAM10to60/WOA23/performance_test
257: ocean/global_ocean/YAMwISC10to60/mesh
258: ocean/global_ocean/YAMwISC10to60/WOA23/init
259: ocean/global_ocean/YAMwISC10to60/WOA23/performance_test
Okay, everything looks good. Let’s set up and run the 2 remaining tests:
compass setup -n 255 256 \
    -p E3SM-Project/components/mpas-ocean/ \
    -w /lcrc/group/e3sm/${USER}/compass_tests/tests_20230527/yam10to60_final
We can save the time of rerunning the mesh test by setting up in the same
work directory as our final mesh run with 10-km finest resolution.
Switch back to your other terminal to alter the job script and submit the job.
cd /lcrc/group/e3sm/${USER}/compass_tests/tests_20230527/yam10to60_final
sbatch job_script.custom.sh
tail -f compass.o*
You should see something a lot like this:
Loading conda environment
Done.

Loading Spack environment...
Done.

ocean/global_ocean/YAM10to60/WOA23/init
  * step: initial_state
  test execution:      SUCCESS
  test runtime:        01:07
ocean/global_ocean/YAM10to60/WOA23/performance_test
  * step: forward
  test execution:      SUCCESS
  test runtime:        01:35
Test Runtimes:
01:07 PASS ocean_global_ocean_YAM10to60_WOA23_init
01:35 PASS ocean_global_ocean_YAM10to60_WOA23_performance_test
Total runtime 02:42
PASS: All passed successfully!
If these tests aren’t successful, you’ll probably need some expert help from the E3SM Ocean Team, but you can take a look at the log files and see if you can diagnose any issues yourself.
Adding a dynamic adjustment test
The initial condition we generated in the last section starts with the ocean at rest. This state is not consistent with the density profile, so there will be a period of a few months of rapid adjustment involving dissipation of energetic wave dissipation and acceleration of currents. We call this period “dynamic adjustment” because the term “spin up” is reserved in Earth system modeling for reaching a quasi-equilibrium over many centuries.
Dynamic adjustment is something of an art, and requires some trial and error in many cases. The basic idea is that we begin with a shorter time step than we hope to be able to use in production simulations and also with some fairly strong momentum dissipation. We run forward in time, monitoring the CFL number and the kinetic energy, which can each tell us if things are going awry. After several days of simulation, waves have hopefully dissipated to the point that we can increase the time step and/or decrease the level of damping.
We need to create a new subdirectory and add a new class for the dynamic adjustment test case. From the branch root:
cd compass/ocean/tests/global_ocean/mesh/yam10to60
mkdir dynamic_adjustment
cd dynamic_adjustment
vim __init__.py
from compass.ocean.tests.global_ocean.dynamic_adjustment import (
    DynamicAdjustment,
)
from compass.ocean.tests.global_ocean.forward import ForwardStep


class YAM10to60DynamicAdjustment(DynamicAdjustment):
    """
    A test case performing dynamic adjustment (dissipating fast-moving waves)
    from an initial condition on the YAM10to60 MPAS-Ocean mesh

    Attributes
    ----------
    restart_filenames : list of str
        A list of restart files from each dynamic-adjustment step
    """

    def __init__(self, test_group, mesh, init, time_integrator):
        """
        Create the test case

        Parameters
        ----------
        test_group : compass.ocean.tests.global_ocean.GlobalOcean
            The global ocean test group that this test case belongs to

        mesh : compass.ocean.tests.global_ocean.mesh.Mesh
            The test case that produces the mesh for this run

        init : compass.ocean.tests.global_ocean.init.Init
            The test case that produces the initial condition for this run

        time_integrator : {'split_explicit', 'RK4'}
            The time integrator to use for the forward run
        """
        if time_integrator != 'split_explicit':
            raise ValueError(f'{mesh.mesh_name} dynamic adjustment not '
                             f'defined for {time_integrator}')

        restart_times = ['0001-01-03_00:00:00']
        restart_filenames = [
            f'restarts/rst.{restart_time.replace(":", ".")}.nc'
            for restart_time in restart_times]

        super().__init__(test_group=test_group, mesh=mesh, init=init,
                         time_integrator=time_integrator,
                         restart_filenames=restart_filenames)

        module = self.__module__

        shared_options = \
            {'config_AM_globalStats_enable': '.true.',
             'config_AM_globalStats_compute_on_startup': '.true.',
             'config_AM_globalStats_write_on_startup': '.true.',
             'config_use_activeTracers_surface_restoring': '.true.'}

        # first step
        step_name = 'damped_adjustment_1'
        step = ForwardStep(test_case=self, mesh=mesh, init=init,
                           time_integrator=time_integrator, name=step_name,
                           subdir=step_name, get_dt_from_min_res=False)

        namelist_options = {
            'config_run_duration': "'00-00-02_00:00:00'",
            'config_dt': "'00:03:00'",
            'config_btr_dt': "'00:00:06'",
            'config_implicit_bottom_drag_type': "'constant_and_rayleigh'",
            'config_Rayleigh_damping_coeff': '1.0e-4'}
        namelist_options.update(shared_options)
        step.add_namelist_options(namelist_options)

        stream_replacements = {
            'output_interval': '00-00-10_00:00:00',
            'restart_interval': '00-00-02_00:00:00'}
        step.add_streams_file(module, 'streams.template',
                              template_replacements=stream_replacements)

        step.add_output_file(filename=f'../{restart_filenames[0]}')
        self.add_step(step)
This sets up one step called damped_adjustment_1 that runs for 2 days
with 3-minute time steps (we hope to run with a 5 or 6 minute time steps once
we’re fully adjusted, given the 10-km minimum resolution), 6-second
subcycling (barotropic or btr) time step, and a strong Rayleigh damping
of 1e-4. Since we’re running for 2 days, we set the restart interval to 2
days.
You should be able to pick a time step in proprotion to the highest resolution in your mesh. If a 3-minute time steps works well for a 10 km mesh (and that’s a little on the safe side), the time step for a 1 km mesh would need to be on the order of 20 seconds. The barotropic time step needs to be 20-30 times shorter than the full time step.
We have enabled global stats (config_AM_globalStats_enable = .true.) so
we can monitor the progress more easily.
We have also set up a set of streams for writing out data as we go. The
streams.template file that we will modify looks something like this:
vim streams.template
<streams>

<stream name="output"
        output_interval="{{ output_interval }}"/>
<immutable_stream name="restart"
                  filename_template="../restarts/rst.$Y-$M-$D_$h.$m.$s.nc"
                  output_interval="{{ restart_interval }}"/>

<stream name="globalStatsOutput"
        output_interval="0000_00:00:01"/>

</streams>
The output_interval and restart_interval will get replaced with
different values in different steps as we add them.
We need to add the dynamic adjustment test case to the global_ocean test
group:
cd ../../../
vim __init__.py
...

from compass.ocean.tests.global_ocean.mesh.wc14.dynamic_adjustment import (
    WC14DynamicAdjustment,
)
from compass.ocean.tests.global_ocean.mesh.yam10to60.dynamic_adjustment import ( # noqa: E501
    YAM10to60DynamicAdjustment,
)
from compass.ocean.tests.global_ocean.monthly_output_test import (
    MonthlyOutputTest,
)

...

class GlobalOcean(TestGroup):

    ...

    def __init__(self, mpas_core):

        ...

        for mesh_name in ['YAM10to60', 'YAMwISC10to60']:
            mesh_test = Mesh(test_group=self, mesh_name=mesh_name,
                             remap_topography=True)
            self.add_test_case(mesh_test)

            init_test = Init(test_group=self, mesh=mesh_test,
                             initial_condition='WOA23')
            self.add_test_case(init_test)

            self.add_test_case(
                PerformanceTest(
                    test_group=self, mesh=mesh_test, init=init_test,
                    time_integrator='split_explicit'))

            dynamic_adjustment_test = YAM10to60DynamicAdjustment(
                test_group=self, mesh=mesh_test, init=init_test,
                time_integrator='split_explicit')
            self.add_test_case(dynamic_adjustment_test)

        # A test case for making E3SM support files from an existing mesh
        self.add_test_case(FilesForE3SM(test_group=self))

    ...
Let’s see if the test cases show up:
compass list | grep YAM
You should see something like:
254: ocean/global_ocean/YAM10to60/mesh
255: ocean/global_ocean/YAM10to60/WOA23/init
256: ocean/global_ocean/YAM10to60/WOA23/performance_test
257: ocean/global_ocean/YAM10to60/WOA23/dynamic_adjustment
258: ocean/global_ocean/YAMwISC10to60/mesh
259: ocean/global_ocean/YAMwISC10to60/WOA23/init
260: ocean/global_ocean/YAMwISC10to60/WOA23/performance_test
261: ocean/global_ocean/YAMwISC10to60/WOA23/dynamic_adjustment
Okay, everything looks good. Let’s set up and run the dynamic_adjustment test:
compass setup -n 257 \
    -p E3SM-Project/components/mpas-ocean/ \
    -w /lcrc/group/e3sm/${USER}/compass_tests/tests_20230527/yam10to60_final
Switch back to your other terminal to submit the job.
cd /lcrc/group/e3sm/${USER}/compass_tests/tests_20230527/yam10to60_final
sbatch job_script.custom.sh
tail -f compass.o*
This time, the output should look like:
Loading conda environment
Done.

Loading Spack environment...
Done.

ocean/global_ocean/YAM10to60/WOA23/dynamic_adjustment
  * step: damped_adjustment_1
  test execution:      ERROR
  see: case_outputs/ocean_global_ocean_YAM10to60_WOA23_dynamic_adjustment.log
  test runtime:        06:03
Test Runtimes:
06:03 FAIL ocean_global_ocean_YAM10to60_WOA23_dynamic_adjustment
Total runtime 06:03
FAIL: 1 test failed, see above.
This error isn’t a big deal. It’s related to the fact that we’re not done
implementing the test case and it’s expecting a step called simulation that
we haven’t added yet:
$ tail -n 20 case_outputs/ocean_global_ocean_YAM10to60_WOA23_dynamic_adjustment.log

Running: srun -c 1 -N 6 -n 768 ./ocean_model -n namelist.ocean -s streams.ocean

compass calling: compass.ocean.tests.global_ocean.mesh.yam10to60.dynamic_adjustment.YAM10to60DynamicAdjustment.validate()
  inherited from: compass.ocean.tests.global_ocean.dynamic_adjustment.DynamicAdjustment.validate()
  in /gpfs/fs1/home/ac.xylar/compass/add-rrm-tutorial/compass/ocean/tests/global_ocean/dynamic_adjustment.py

Exception raised in the test case's validate() method
Traceback (most recent call last):
  File "/gpfs/fs1/home/ac.xylar/compass/add-rrm-tutorial/compass/run/serial.py", line 335, in _log_and_run_test
    test_case.validate()
  File "/gpfs/fs1/home/ac.xylar/compass/add-rrm-tutorial/compass/ocean/tests/global_ocean/dynamic_adjustment.py", line 63, in validate
    compare_variables(test_case=self, variables=variables,
  File "/gpfs/fs1/home/ac.xylar/compass/add-rrm-tutorial/compass/validate.py", line 94, in compare_variables
    raise ValueError('{} does not appear to be an output of any step '
ValueError: simulation/output.nc does not appear to be an output of any step in this test case.
You can also monitor the result by looking at the global statistics:
cd ocean/global_ocean/YAM10to60/WOA23/dynamic_adjustment/damped_adjustment_1
source load_compass_env.sh
ncdump -v kineticEnergyCellMax analysis_members/globalStats*.nc
ncdump -v CFLNumberGlobal analysis_members/globalStats*.nc
The kinetic energy should increase gradually (and then likely decrease because of the damping) but shouldn’t spike up during a damped adjustment step. The CFL number ideally shouldn’t exceed about 0.1 during damped adjustment, though we tend to push it a bit higher during the simulation phase to see how large we can make it while maintaining stability.
You can also monitor the MPAS-Ocean progress (e.g. the time stepping) with:
tail log.ocean.0000.out
If the damped_adjustment_1 step is successful, it’s time to add more steps
in which we will ramp down damping and then increase the time step. Let’s add a
second step that runs longer (8 days) with less damping:
vim __init__.py
...

class YAM10to60DynamicAdjustment(DynamicAdjustment):

    ...

    def __init__(self, test_group, mesh, init, time_integrator):

        ...

        restart_times = ['0001-01-03_00:00:00', '0001-01-11_00:00:00']

        ...

        step.add_output_file(filename=f'../{restart_filenames[0]}')
        self.add_step(step)

         # second step
        step_name = 'damped_adjustment_2'
        step = ForwardStep(test_case=self, mesh=mesh, init=init,
                           time_integrator=time_integrator, name=step_name,
                           subdir=step_name, get_dt_from_min_res=False)

        namelist_options = {
            'config_run_duration': "'00-00-08_00:00:00'",
            'config_dt': "'00:03:00'",
            'config_btr_dt': "'00:00:05'",
            'config_implicit_bottom_drag_type': "'constant_and_rayleigh'",
            'config_Rayleigh_damping_coeff': '1.0e-5',
            'config_do_restart': '.true.',
            'config_start_time': f"'{restart_times[0]}'"}
        namelist_options.update(shared_options)
        step.add_namelist_options(namelist_options)

        stream_replacements = {
            'output_interval': '00-00-10_00:00:00',
            'restart_interval': '00-00-02_00:00:00'}
        step.add_streams_file(module, 'streams.template',
                              template_replacements=stream_replacements)

        step.add_input_file(filename=f'../{restart_filenames[0]}')
        step.add_output_file(filename=f'../{restart_filenames[1]}')
        self.add_step(step)
You can set up again and test the second step. In your coding terminal:
compass setup -n 257 \
    -p E3SM-Project/components/mpas-ocean/ \
    -w /lcrc/group/e3sm/${USER}/compass_tests/tests_20230527/yam10to60_final
Back in your terminal in the work directory:
cd /lcrc/group/e3sm/${USER}/compass_tests/tests_20230527/yam10to60_final
cd ocean/global_ocean/YAM10to60/WOA23/dynamic_adjustment/damped_adjustment_2
sbatch job_script.sh
tail -f compass.o*
Again, you will get errors about the missing simulation/output.nc file,
but don’t worry about those.
If that goes okay, let’s add a third step that runs for 10 days with even less
damping. We can also write out less frequent restarts (every 10 days). In
the coding terminal, which should still be in the dynamic_adjustment
subdirectory:
vim __init__.py
...

class YAM10to60DynamicAdjustment(DynamicAdjustment):

    ...

    def __init__(self, test_group, mesh, init, time_integrator):

        ...

        restart_times = ['0001-01-03_00:00:00', '0001-01-11_00:00:00',
                         '0001-01-21_00:00:00']

        ...

        step.add_input_file(filename=f'../{restart_filenames[0]}')
        step.add_output_file(filename=f'../{restart_filenames[1]}')
        self.add_step(step)

        # third step
        step_name = 'damped_adjustment_3'
        step = ForwardStep(test_case=self, mesh=mesh, init=init,
                           time_integrator=time_integrator, name=step_name,
                           subdir=step_name, get_dt_from_min_res=False)

        namelist_options = {
            'config_run_duration': "'00-00-10_00:00:00'",
            'config_dt': "'00:03:00'",
            'config_btr_dt': "'00:00:06'",
            'config_implicit_bottom_drag_type': "'constant_and_rayleigh'",
            'config_Rayleigh_damping_coeff': '1.0e-6',
            'config_do_restart': '.true.',
            'config_start_time': f"'{restart_times[1]}'"}
        namelist_options.update(shared_options)
        step.add_namelist_options(namelist_options)

        stream_replacements = {
            'output_interval': '00-00-10_00:00:00',
            'restart_interval': '00-00-10_00:00:00'}
        step.add_streams_file(module, 'streams.template',
                              template_replacements=stream_replacements)

        step.add_input_file(filename=f'../{restart_filenames[1]}')
        step.add_output_file(filename=f'../{restart_filenames[2]}')
        self.add_step(step)
Set up again in the coding terminal:
compass setup -n 257 \
    -p E3SM-Project/components/mpas-ocean/ \
    -w /lcrc/group/e3sm/${USER}/compass_tests/tests_20230527/yam10to60_final
And run this step in the work-directory terminal:
cd /lcrc/group/e3sm/${USER}/compass_tests/tests_20230527/yam10to60_final
cd ocean/global_ocean/YAM10to60/WOA23/dynamic_adjustment/damped_adjustment_3
sbatch job_script.sh
tail -f compass.o*
Now, we add a fourth that runs for 20 days without any damping, back in the coding terminal:
vim __init__.py
...

class YAM10to60DynamicAdjustment(DynamicAdjustment):

    ...

    def __init__(self, test_group, mesh, init, time_integrator):

        ...

        restart_times = ['0001-01-03_00:00:00', '0001-01-11_00:00:00',
                         '0001-01-21_00:00:00', '0001-02-10_00:00:00']

        ...

        step.add_input_file(filename=f'../{restart_filenames[1]}')
        step.add_output_file(filename=f'../{restart_filenames[2]}')
        self.add_step(step)

        # fourth step
        step_name = 'damped_adjustment_4'
        step = ForwardStep(test_case=self, mesh=mesh, init=init,
                           time_integrator=time_integrator, name=step_name,
                           subdir=step_name, get_dt_from_min_res=False)

        namelist_options = {
            'config_run_duration': "'00-00-20_00:00:00'",
            'config_dt': "'00:03:00'",
            'config_btr_dt': "'00:00:06'",
            'config_do_restart': '.true.',
            'config_start_time': f"'{restart_times[2]}'"}
        namelist_options.update(shared_options)
        step.add_namelist_options(namelist_options)

        stream_replacements = {
            'output_interval': '00-00-10_00:00:00',
            'restart_interval': '00-00-10_00:00:00'}
        step.add_streams_file(module, 'streams.template',
                              template_replacements=stream_replacements)

        step.add_input_file(filename=f'../{restart_filenames[2]}')
        step.add_output_file(filename=f'../{restart_filenames[3]}')
        self.add_step(step)
Set up again in the coding terminal:
compass setup -n 257 \
    -p E3SM-Project/components/mpas-ocean/ \
    -w /lcrc/group/e3sm/${USER}/compass_tests/tests_20230527/yam10to60_final
And run this step in the work-directory terminal:
cd /lcrc/group/e3sm/${USER}/compass_tests/tests_20230527/yam10to60_final
cd ocean/global_ocean/YAM10to60/WOA23/dynamic_adjustment/damped_adjustment_4
sbatch job_script.sh
tail -f compass.o*
Finally, we add one more step where we run for 10 more days with a longer time step:
vim __init__.py
...

class YAM10to60DynamicAdjustment(DynamicAdjustment):

    ...

    def __init__(self, test_group, mesh, init, time_integrator):

        ...

        restart_times = ['0001-01-03_00:00:00', '0001-01-11_00:00:00',
                         '0001-01-21_00:00:00', '0001-02-10_00:00:00',
                         '0001-02-20_00:00:00']

        ...

        step.add_input_file(filename=f'../{restart_filenames[2]}')
        step.add_output_file(filename=f'../{restart_filenames[3]}')
        self.add_step(step)

        # final step
        step_name = 'simulation'
        step = ForwardStep(test_case=self, mesh=mesh, init=init,
                           time_integrator=time_integrator, name=step_name,
                           subdir=step_name, get_dt_from_min_res=False)

        namelist_options = {
            'config_run_duration': "'00-00-10_00:00:00'",
            'config_dt': "'00:08:00'",
            'config_btr_dt': "'00:00:15'",
            'config_do_restart': '.true.',
            'config_start_time': f"'{restart_times[3]}'"}
        namelist_options.update(shared_options)
        step.add_namelist_options(namelist_options)

        stream_replacements = {
            'output_interval': '00-00-10_00:00:00',
            'restart_interval': '00-00-10_00:00:00'}
        step.add_streams_file(module, 'streams.template',
                              template_replacements=stream_replacements)

        step.add_input_file(filename=f'../{restart_filenames[3]}')
        step.add_output_file(filename=f'../{restart_filenames[4]}')
        step.add_output_file(filename='output.nc')
        self.add_step(step)

        self.restart_filenames = restart_filenames
Set up again in the coding terminal:
compass setup -n 257 \
    -p E3SM-Project/components/mpas-ocean/ \
    -w /lcrc/group/e3sm/${USER}/compass_tests/tests_20230527/yam10to60_final
And run this step in the work-directory terminal:
cd /lcrc/group/e3sm/${USER}/compass_tests/tests_20230527/yam10to60_final
cd ocean/global_ocean/YAM10to60/WOA23/dynamic_adjustment/simulation
sbatch job_script.sh
tail -f compass.o*
The art of this process goes into how you choose to adjust the time step, duration of each of these runs, and the amount of damping. You may add more steps or remove some if 5 doesn’t work well for your mesh. Make sure that the restart file that is an output of the previous step is the input to the next one.
It’s also a good idea to take a look at a few output fields in ParaVeiw. First, run:
paraview_vtk_field_extractor -m init.nc \
    -f output.nc -v normalVelocity,temperature,salinity \
    -d nVertLevels=0
Then, transfer the contents of vtk_files to your laptop or desktop and open
the file fieldsOnCells.pvd or fieldsOnEdges.pvd in ParaView.
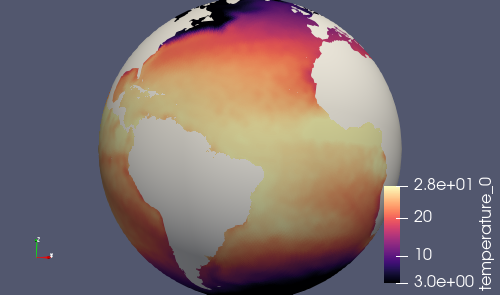
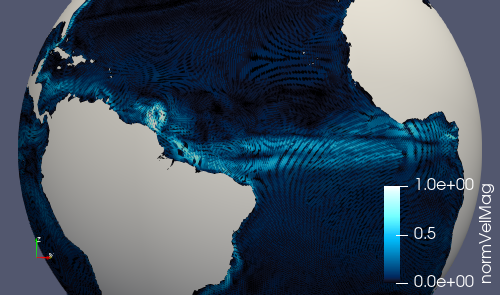
Note that normalVelocity is a pretty noisy field because its orientation
differs by on the order of 60 degrees between adjacent edges. It helps to take
the absolute value as shown below, in which case it it can indicate where
strong currents are present.
Alternatively, you can add fields like kineticEnergyCell to the output
stream in streams.ocean before running the step, and then you will have
this field available to visualize.
Adding a files for E3SM test
The final test case to add for a new RRM mesh is files_for_e3sm. This test
case creates a number of important files in the format they are needed for
E3SM or diagnostic software used to analysis E3SM simulations. No additional
customization should be needed for this mesh beyond the config options we
already set up earlier in the tutorial. We just need to add the test case
itself for this mesh to the global_ocean test group.
Starting from the root of our development branch:
cd compass/ocean/tests/global_ocean
vim __init__.py
...

class GlobalOcean(TestGroup):

    ...

    def __init__(self, mpas_core):

        ...

        # Kuroshio meshes without ice-shelf cavities
        self._add_tests(mesh_names=['Kuroshio12to60', 'Kuroshio8to60'],
                        DynamicAdjustment=KuroshioDynamicAdjustment)

        self._add_tests(mesh_names=['YAM10to60', 'YAMwISC10to60'],
                        DynamicAdjustment=YAM10to60DynamicAdjustment)

        # A test case for making E3SM support files from an existing mesh
        self.add_test_case(FilesForE3SM(test_group=self))

    ...
We delete the whole for loop over mesh_name and instead take advantage
of the fact that the _add_tests() method of GlobalOcean will
add the 5 test cases we want by default. (We added them manually, one by one
before so we could test them one or two at a time.)
Now, when you list the tests, you should see:
$ compass list | grep YAM
 254: ocean/global_ocean/YAM10to60/mesh
 255: ocean/global_ocean/YAM10to60/WOA23/init
 256: ocean/global_ocean/YAM10to60/WOA23/performance_test
 257: ocean/global_ocean/YAM10to60/WOA23/dynamic_adjustment
 258: ocean/global_ocean/YAM10to60/WOA23/files_for_e3sm
 259: ocean/global_ocean/YAMwISC10to60/mesh
 260: ocean/global_ocean/YAMwISC10to60/WOA23/init
 261: ocean/global_ocean/YAMwISC10to60/WOA23/performance_test
 262: ocean/global_ocean/YAMwISC10to60/WOA23/dynamic_adjustment
 263: ocean/global_ocean/YAMwISC10to60/WOA23/files_for_e3sm
Once again, you can take advantage of the test cases you’ve already run,
setting up just the new files_for_e3sm test from the coding terminal:
compass setup -n 258 \
    -p E3SM-Project/components/mpas-ocean/ \
    -w /lcrc/group/e3sm/${USER}/compass_tests/tests_20230527/yam10to60_final
And run this test case in the work-directory terminal:
cd /lcrc/group/e3sm/${USER}/compass_tests/tests_20230527/yam10to60_final
cd ocean/global_ocean/YAM10to60/WOA23/files_for_e3sm
sbatch job_script.sh
tail -f compass.o*
If this goes well, you are ready to ask for help from members of the E3SM
Ocean Team to add support for your mesh to E3SM itself, including uploading
the files produced by the files_for_e3sm test case to the E3SM
inputdata and diagnostics directories on our data server. This is
beyond the scope of this tutorial and is not typically something a non-expert
can take on on their own.